Showing posts with label paper crafts. Show all posts

Tuesday, January 24, 2012

More Valentine Boxes

Valentine boxes are HANDS DOWN my favorite craft activity to do with my kids.  {Can you tell?}  OK, Mommy did help her kindergartner quite a bit with this version of the Tissue Box Monster idea from Family Fun Magazine. {The marabou feather eyelash were all mine!} The ears are foam hearts folded and hot-glued in half and the teeth are white felt.  Don't you love that faux alligator paper?
 My son unseated the four-time classroom Valentine box champion with this front loading washing machine box. {She was the room mom's daughter and quite heart broken about not winning the coveted prize, but hey, you can't win 'em all.}  We just printed out logos from the internet and used that weird sculpting stuff to look like bubbles. (Leave me a comment if you remember what it's called!) The washing machine door was the lid to a box of pretty dishes I received. (I'm always looking out for boxes that I can use for just this type of project!)

We just happened to have a box with a cute window for this cell phone box, but you could use a cereal or shoebox for this too and create your own cool text display.  The buttons are fun foam that we stamped numbers on.
Here are the super easy Valentines Kate made.  The inside says "you're out of this world" and we colored the eyes and flower with a white gel pen.  So, what are you making this year for Valentine's Day?  Leave me a note or a link to your creations.

Valentine Treat Cone


This is a sweet and unique Valentine treat to try this year!  I originally got the idea from Martha Stewart's site, but she didn't have step-by-step instructions.  (Hopefully you will have better luck with my pictures ;)


1. Start with square paper (mine was 6"x6") and fold corner to corner in both directions, in half both directions, then push in two opposite corners, so that it looks like the photo.
2. Use an oval shape cutter or a heart shape that you have to make a heart pattern on the square with the folded point down.

 3. Cut the round portions of your heart shape, making sure that the folds are on the bottom.
 4. Push in the the inside valley folds so that it forms a cone or cup shape.
 (It's hard to hold it and take a picture!)
 5. Use some adhesive or a stapler to affix the center portion and add holes, if desired to hang a tag (or hang the treat up, like from a door knob or a coat hook.)
 Wouldn't a pile of these make a pretty centerpiece on a round table?
 Leave me a note if you try these out.  They are not as hard as they look, I promise!

Tuesday, February 10, 2009

Valentine Boxes


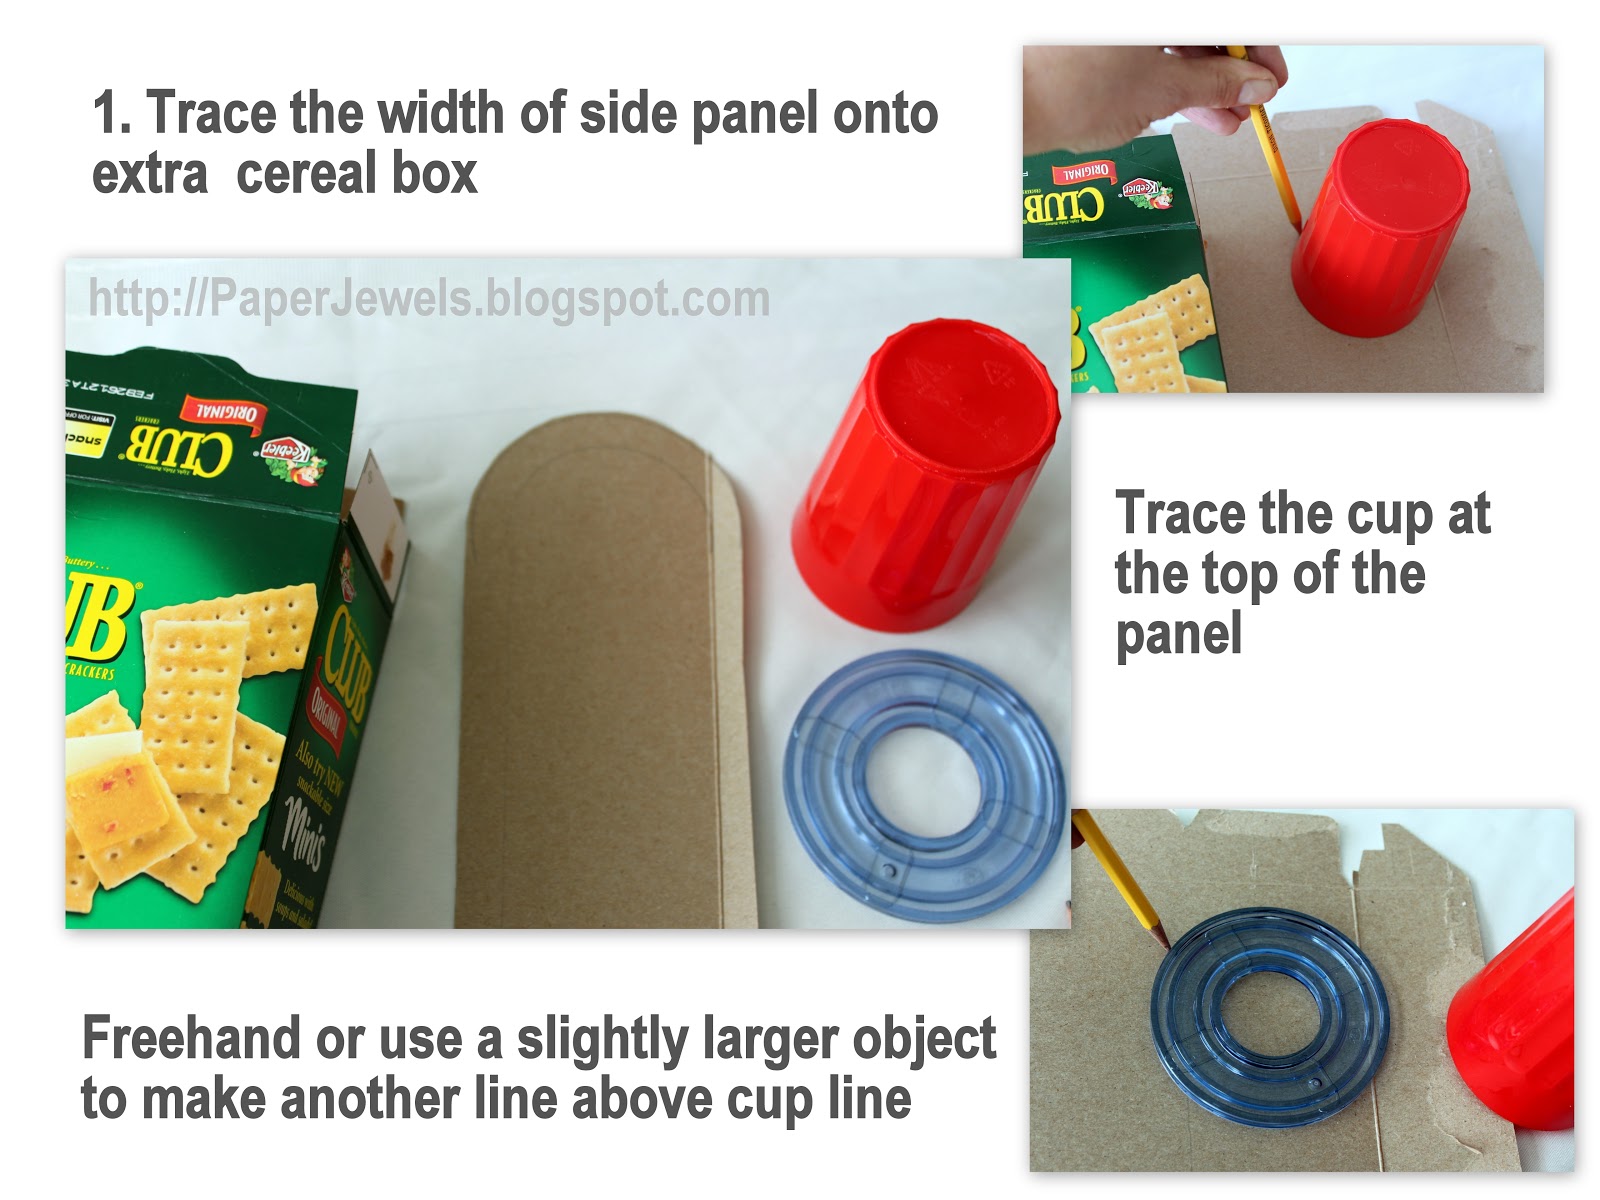
Do your kids make boxes to bring to class for their valentines? Here's what my girls and I came up with last night. Katelyn's is made out of a frozen waffle box and some extra cereal box for the rounded top. It's reminiscent of the street corner type mailbox. Isn't the flap cute?
{Instructions below!}


Lily's preschool class has six students, so this cereal box turned ipod is just the right size. Katelyn gave me the idea to make earbuds out of two foam hearts stuck together. Isn't she a paper crafting genius? I wonder where she gets that from?


So here are instructions on how I made the Valentine Mailbox:


Happy Valentine's day!

Tuesday, October 30, 2007

Card and Notepad Folio

I received so many kind gestures in the last couple of weeks, as I've been going through a tough time, so I decided to make up some thank you's.

I whipped up cards that were super quick and easy, using colored notecard sets that were on clearance. This gave me a little head start, but still allowed me to give the cards a handmade touch. When you are out and about, keep your eye out for notecards. These "U" monogram cards quickly turn into Thank U, Thinking of U, etc. with your basic greeting stamps. I covered the striped card with a birthday message, and with its colorful stripes, it could be used for a male or female birthday! Here are a couple more pictures. Enjoy and thank for stopping by!


Saturday, September 29, 2007

More Fall Supplement Scrapbook Pages

Here are a couple more pages using sets from the TAC Fall Supplement. Cha Cha paper is so fun for fall!

Thursday, September 27, 2007

Kids Table Collection on the TAC Fall Supplement

I'm so excited to share some fun projects with you fromThe Angel Company's Fall 2007 Supplement! When I saw this set, Count Your Blessings, I thought about my kiddos around the Thanksgiving table. We always talk about what we're thankful for, so I made this My Blessings Coaster Placecard Holder. It's a great place for kids to write down their blessings while they are waiting for dinner. My blessings include my husband John, son Jack (8) and daughters Katelyn (6) and Lily (2). You can see a couple more of my projects within the supplement, including one of the kids and me in the kitchen. I hope you enjoy crafting and preparing for your fall holidays!

Wednesday, September 19, 2007

Spooky Treats

Here are a couple of cute treats for your little goblins! I made this treat with a metal tin that has a clear plastic top. I stamped it with StazOn ink and used Glaze Jelly Pens to color it in.
This adorable card and envelope was made by my friend Gwen Zimmerman. (We're in a swap together.) It uses Simply Spooky Halloween paper. Check out her instructions and other ideas for these cute 3x3 cards and the envelope template on her blog. I love this idea so much that we're casing her idea (thanks Gwen!) for the upcoming Mile High Angel Gathering! It's so fun now that the fall craft season has begun!

Monday, July 30, 2007

Ink Up Bazzill Bitty Blossoms and Heidi Swapp Florals


I have such fun with florals. Whether they are vibrantly colored, like our Assorted Bazzill Bitty Blossoms or are white (we have the White Bitty Blossoms and White Heidi Swapp Florals) they are fun to use and even more fun to color with a little ink. I like Palette Inks the best, but they are also beautiful with the Versamagic chalk inks.
Our Hydra Sponges can be turned into at least six perfectly sized applicators by cutting them into wedges. I have one in each basic color and keep them near my desk. (You get 6 in a package for $6.95 so they will last forever!) They are perfect for adding a touch of color to paper (obviously) as well. And don't stop there! Ink up ribbons, staples, Paper Posies, chipboard, book binding tape--you name it. When you add a little ink to your project, everything coordinates. Everything harmonizes. What could be more fun and easy than that?
Jewels
Julie Griffith
Ind. Demonstrator, The Angel Company

Saturday, July 21, 2007

Chipboard/Board Books


Check out my "Cute Kate" Board Book!
Supplies: Ribbon Words (T2287) and Running Stitches (T2610) Stamp Sets, Gentle Beginnings Designer Collection Paper(V900), ABC Frameworks chipboard(A10), Brown CS(V73), Burnt Umber Palette Ink(TT218), McGill Mini File Tab Punch(D881)
This book was so easy and fun! It uses less than 4 pages of paper, 2 stamp sets and 1 ink color. I love stamp stitching and using the ribbon words was so much fun, since it has such cute phrases and I was able to cut them up for even more versatility. Click on any of the item numbers above to pick up the supplies to make your own chipboard book, or browse the chipboard book section of my online shipping cart. You can also email me for one of my stamp stitching kits. On special for $29 (regularly $34), it gives you the stitches, block, ink and distresser used in my Cute Kate project. What a deal!
Jewels
Julie Griffith - Demonstrator/Manager, The Angel Company

Monday, July 16, 2007

Scallop Borders with Circle Stamps

I made a cute card today for an upcoming swap and I stole another idea from my friend Kim! (Do you want to come and steal ideas from her too? If you're in the Denver/Parker, Colorado area, come scrapbooking this Friday with us at church!)
I got one of my new sets from our new catalogue today called Blossom Builders and I used one of the circle flower centers to make this scalloped border! Isn't that fun? Scallops are so hot right now. You see them in borders, circles and squares, and you can make any shape you want. I found it easiest to follow a straight line with my ruler.
Don't have a circle stamp? Try this cool idea from one of my other creative friends, Jen. She does scallops with a circle punch! Isn't that neat? By the way, you know how you see great idea on someone's blog and you want to go find it later? Well, on Blogger, it's really easy to search for a topic. See the white blank and the "SEARCH BLOG" up in the top left hand side of the border? That's where you can search the whole blog for the topic you're looking for. So easy! Well, enjoy this tip and try it out. Post a comment and a link to your card so we can all check it out. Ciao!
Jewels
Julie Griffith - Demonstrator/Manager, The Angel Company

Wednesday, July 11, 2007

Starbook with the New TAC Hemingway Collection


I was inspired by the starbook we made at seminar to make this one from the new Hemingway Soar With It Collection from The Angel Company. My son Jack's personality is really captured by the stamp set, About a Boy. With our 8 new beautiful paper collections, TAC offers coordinated cardstocks, hardware and ribbons that make preserving your memories easy and so much fun!

Sunday, July 1, 2007

My Girl Flip Book Featured in TAC Idea Book & Catalogue


It's here! The 2007 Fall Idea Book & Catalog for The Angel Company has just been unveiled! Among the 8 beautiful new paper lines was one of my returning favorites: Genevieve. It's the one I used to design this flip book of my daughter Katelyn, which was featured in the catalogue on Page 29. See the instructions here.

It's just one of the hundreds of gorgeous cards, pages and projects in our full-color Idea Book. Email me today for your copy!

Wednesday, June 27, 2007

One Sheet Treat Box

This cute little project has a ton of possibilities. From packaging candy treats to little birthday gifts, you'll find so many reason to make these fun boxes. See the slideshow tutorial here. It features the new Curls and Swirls set, which is my new favorite!

We're making this box plus 20 other projects later today at the 2007 Pre-Seminar Social that my fellow Angel, Avis, hosts. It's the first of four fun days surrounding The Angel Company's Annual Seminar in Kansas City. This one is extra special, since we're celebrating the company's 10th Anniversary!

Stay tuned for other fun announcements, including the unveiling of our new catalog!

Friday, June 22, 2007

Piercing, Dotting and Stitching with Embroidery Grid


I am busy getting ready for The Angel Company's Annual Seminar (next week), but I wanted to share with you a great technique that I'm using on one of my many, many swap cards I am making to trade. I learned this from my friend, Kim Singdahlsen, who organizes our monthly card-making event at our church. (If you are in the Denver area, you've got to join us and see these great ideas! Click "Get on my Email List" below for dates and directions for upcoming events.)
As you can see in the slideshow, (click the little Picasa logo to go see it full screen) plastic canvas makes an awesome guide for piercing, dotting and stitching on your cards. Our Souffle Pens are so fun. They add dimension and shine to flat and shiny surfaces. The technique on the colored cardstock is emboss resist (glossy paper, clear EP and brayered with Boudoir Blush and Claret Palette pads). The stamp set is Artsy Elements, which was a Jubilee Hostess Set that I hope comes out with the new catalog.
Speaking of the new catalog, I'll be out of town next week for its unveiling, but I'll try to keep you posted here with more techniques and ideas. Look for news from the new catalog at the first of July. . . .

Tuesday, May 22, 2007

Envelope Gift Bag for Card Set

It sneaks up on me every year. It's not that I forget to honor the teachers in my family's life. It's that I forget how many there are! Dance teachers, school teachers, Cub Scout leaders--yikes! Well, if you like to make cards like I do, what better gift than a card set?
Make this easy gift "bag" for your cards with a large envelope. (See slideshow for instructions.)
The cards I'm making are from my "Darling Details" card class, which I teach in my studio or your home. Techniques include Simply Stickles, Stamp Stitching, Charming Chalks, and Shabby Chic. Although the little details create that "finishing touch" they can be made in a flash, so you can make a pile of cards fast! Call me today to schedule a class!
These cards also feature our Bella Flor paper. You'll be amazed at how many cards you can make from one paper pack!

Thursday, May 17, 2007

Punctuation?


I'm loving the Punctuation set from Spring Fling. It can be used just like flourishes to create interesting designs on your cards and scrapbook pages! See what you can come up with using this set and post a link.
Now I'm off to case Heather's latest creation: the cd folder book. I'll post a picture when I get done . . .
Posted by Picasa

Tuesday, May 15, 2007

Candy Tin Scrapbook

Check out this little scrapbook of my sweeties, made with the The Angel Company's Mulberry Meadow paper and Candy Tin, which comes with the insert all ready to decorate and add all those little wallet photos you have of your kiddos. This is a perfect gift to make for grandma and grandpa and leave room for them to add more photos. The paper matches perfectly with the Versamagic Jewel Box Dew Drop inks, so it's so easy to coordinate colors. To see all the steps and instructions, visit my slideshow and to order the products, email me or visit my secure shopping cart.

Monday, May 14, 2007

Kamalaht Purse and Card Gift Set


Don't you love it when you have the perfect little gift at the ready right when you need it? There are so many birthdays, graduations, not to mention Mother's Day that have been happening lately, I was so happy to have this little gift set, all ready to give. It's filled with cards that are great for any occasion and they can be masculine or feminine (we all know how hard it is to make a card for those guys!). Make a little set like this by checking out my friend Camille's class or getting one of her kits. You'll get all the paper and instructions ready to go! You'll be so glad you did, the next time you need the perfect little gift!

Tuesday, May 8, 2007

Paisley Mini Scrapbook


I made this fun book from a kit I got from Stephanie Breckbill's mini scrapbook class. It was so easy and the kit even comes with the Paisley Rockz stamp set! Can you believe that this is one set I never got, but now I'm in love with it! I added the hostess set Younique and used pictures of my kids from Easter. To see the whole book, view my slideshow and to get the kit, email Stephanie. You'll love making the book. It's a project you could do with kids or a last minute Mother's Day gift . . .

Monday, May 7, 2007

Charming Chalk Techniques


Happy Bugday, and Hello to all the new friends I met at the stamping convention this weekend! It is so much fun to spend a day and a half with people who love to do what I do and share ideas. Here is a card from my Saturday class. We made the card tin and filled it with four cute cards. This one uses our Versamagic Tea Leaves chalk ink. It's so soft and velvety. I added a little blue sparkle to his wings with Jewel Tones chalk. I love those chalks! You can color with them using a blender pen, sweep it over Versamark or add it to an image that's been freshly stamped with chalk ink. It's such a nice effect. I also created faux brads with Liquid Pearls and I have a really fun tip for how I did the grass. Well, you love using Versamark on cardstock to give it that watermark look, right? On Matchmaker Cardstock, there's a little trick to get that look. After stamping, you lightly sand the paper with a sanding block and the image appears like magic! You've got to try this! Have fun and stay tuned for more techniques and darling details! (PS-Are you looking for this set? It's from Spring Fling and paper if Bella Flor.)