If you're new to digital or hybrid scrapbooking, (or even if you're not) you probably love finding free digital papers you can download. The Angel Company is offering a new set of B&W papers that you can download here: http://theangelcompany.net/Downloads.html (There are two sets, so be sure to scroll down to see them all.)
So, they are pretty cool in B&W, but if you want to add a little color, it's very easy. You need to convert the papers to jpeg and use my favorite FREE photo software, Picasa. Here's how: With the Picasa running in the background, open the pdf document and change the view so that the full page can be seen. (It can also be helpful to use F11 for "full screen".) Press Ctrl + Prt Sc, then switch to Picasa and the screen capture should be visible. Use crop to highlight just the paper portion of the image and then save. (The default is to save as a jpg.)
Next, check out this YouTube video to see the step-by-step of how easy it is to recolor the paper with Picasa.
Ready to make some easy scrapbook pages? Try using Picasa's "collage" function! It's easy. Watch another quick video here.
PS- Are you still reading? Please leave a comment on this post, email me or give me the thumbs up in Facebook to let me know you're still out there! I heard a lot of chirping after my last post!
We do a ton of partying at this time of the year. I have been collecting all sorts of good party ideas and I have compiled my favorites here. Hang in there. There's lots to see, and even a chance for you to share your favorite ideas and win an appetizing prize! Below you'll find ideas for:
Easy Food & Drink for Grown Up Celebrations
Kid Friendly & Quick Crafts and Treats
Fun Decorations and Last-Minute Gifts
Candy Corn Pudding Butterscotch on the bottom, vanilla (dyed with yellow food coloring) in the middle, whipped topping on top. (Make this kid friendly by using clear plastic tumblers.)
Bewildering Beverages Here are some ideas for grown up refreshments: Yellow Twilight- Lemonade with an Absolut Bite, Morgueritas-a Deadly Lime Libation, Poison Appletinis- Dangerously Sweet
Glass Markers Grab some circle punches, an alphabet set and some other designs and make these easy glass markers. I used a script background to make veins in the eyeballs and flowers and flourishes for the irises. Make a set and decorate this little bag box to make a great hostess gift.
More Eyeballs The same stamping techniques worked to decorate my Deviled Egg card. The eggs themselves got their red veins from food coloring and vinegar added to a baggy as the hard boiled eggs cooled. Other great savory foods to bring to a party include Mummy Pizzas, Mummy Dogs, and Salty Bones (breadsticks). I found lots of great recipes at Family Fun and Pillsbury.
More Kid Stuff Mummy Tube Treats- these TP treats would make a good gift or craft. We'll be making them at our Girl Scout Halloween Party next week. If you're looking for a quick treat to give kids, try making some of my Yummy Mummy Candy Bars. (Both crafts use common party streamers for the mummy wrap.) I'll even show you how to make them in this video! (Want more hands on instruction? I have a video for Eerie Votive Candles too!)
A Decoration or a Gift Make up a bunch of spooky bottles, using these great downloads from KMcKay Designs. Be sure to ink up your bottles with Palette ink. It should be heat set, but will adhere to glass, giving your project that extra creepiness it needs. You could bring a bottle of wine to your hostess, dressed up with these fun labels or even give a set of labels that are ready to stick on to your favorite hostess's wine or even soda bottles. She will love that!
Now for your ideas . . . . I'd love to hear your favorite tried and true recipe for Halloween. Leave a comment with a link to your favorite recipe (and if you have a paper craft, packaging, label etc. that accompanies it- EVEN BETTER!) The winner will be announced on Friday and will receive the BONE APPETIT STAMP SET! So let's hear 'em!
This was a card design for our church card ministry and I decided to do a treat bag design as well. (That gave me a little more room to add spooky elements, like the spider and paper-pieced pumpkin.) I punched black paper with that Creative Memories punch that does the buckles and little squares. I cut away a section of the grid that comes out of the punch and the great thing is, the more crooked you cut, the cuter the windows are! I love this palette for Halloween. If you are looking for spooky treat ideas, you've got to check out my friend Barb. She's concocting very creepy crafts in her Craft Cave!
We craft every month on the first Thursday from 7-9 pm and the following Friday from 1-3 pm at Joy Lutheran Church. There are always great seasonal ideas and it's fun and FREE!
We've also been making lots of baby cards at church lately. I colored these with the simple watercolor technique.
The other designs we've been doing a lot of are sympathy cards. I personally had to send some sympathy cards, as well as attend a funeral this week. I explained to my two older kids (who attended the funeral with us) that life--in the grand scheme of things--is a balance of sweetness and sorrow. Without rain, we would have no sunshine.
In good times and bad, I turn to my studio to express to those around me a simple sentiment that I hope will help them weather the tough times and celebrate the wonderful things that bless their lives. It reminds me of the Irish blessing, which I'll close with today:
"May the trails rise to meet you, The sun warm your face, The rain fall gently upon your fields And the wind be ever at your back "
If you like to hang out here at my blog, chances are you have a pretty large amount of handmade card fronts. You probably have friends who send you lots of beautiful cards too. Don't store them in a box. Give them new life and Bless it Forward! You can even make a great gift by collecting a few cards and make this card organizer, which is an envelope box covered with paper.
Check out this video to see how I made some low-profile tabbed dividers, to organize the cards by category.
Thanks to all of you who played my Great Greetings Game. Congratulations, Carolyn from Florida!
There is really something special about a handmade card. I love to ponder how many people have been blessed by the card ministry I help with. As I was getting these card designs ready to bring to church tonight, I was mindful of making the inside as meaningful as the outside is beautiful. Cards with insides sell far better than ones without. (The exception is Thank You's. They are OK plain.)
Coordinating the inside of a card is even easier to accomplish with some of the new sayings sets, like Great Greetings from The Angel Company. With coordinating fonts and heartfelt sayings, your cards will really have that extra sparkle. (Click the link for ordering information and to see a larger image.)
There are phrases that work great together, as well as greetings that could go with TAC's other word sets. The "May all your wishes come true" phrase could be added to almost any birthday set for a fun gender-neutral inner greeting. Here I've worked my Semi-Hand Stamped magic for a quick and easy card.
Cleverly Coordinated You've heard me say how much I love our Ordinary Greetings set as well. (Click here to see how I cut it apart to make it even more versatile.) It is a perfect companion to Fishy Friends, since they both have a curly, but not-too-cutesy font. There are so many cards you can make with just those two sets.
Tip: to get the little waves, I flipped over my scallop scissors. Isn't that fun?
This thinking of you card is just right for summer, with its little lobster. The images work great for kids' cards, but I think they work for big people too.
It's your turn: How about a little challenge? Check out the Ordinary Greetings and Fishy Friends sets and leave a comment with your favorite or most original greeting that could be used for the outside and inside of a card. I'll pick a winner and send them ANY $20 SET FROM THE TAC CATALOGUE! It could be Great Greetings or any other set. Wanna Play?
Edited: We have a Winner! Congratulations, Carolyn!
This easy project is one of my favorites, and perfect for so many occasions. This one went to my friend for her 40th birthday. We love being surrounded by photos of friends or family that bring love and laughter to our lives. It's no surprise the stamp set I used for the phrase on the tag, Love and Laughter, was a best seller for The Angel Company last year. It too, is good for so many occasions.
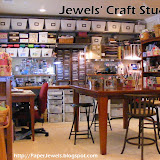
For those of you following my Twitter Tweets who asked about my studio, here is a look at how things are shaping up. Now, keep in mind, this is a work in progress. I seem to thrive in a messy--I mean, creative, environment. My biggest challenge is to put my things away (and to try to find them when I have just thrown them in a pile.) My strategy with my room is to create a place for everything, use a uniform color scheme and inexpensive storage vessels, and to use labels to make sense of it all. Hopefully this will be helpful to those of you that are struggling with organization too. (You might want to also check out this post for some of the pictures I used for inspiration.)
We made this card at my Crafternoon Catalogue Tour and last weekend at the Mile High Angels Summer Celebration. There are some really cute new TAC stamps, so grab a set and try this fun card. It would be great a variety of images.
Basic Measurements and Folds Center Pop Up Piece: 3x11, scored at 5 1/2" Base: 4 1/4 x 9", scored along the 9" side at 1/2, 2, 4 1/2, 7, and 8 1/2" Winged Piece: 3 3/4 x 6, scored along the 6" side at 1 1/2 and 4 1/2
Assembly
Mountain fold all pieces.
Adhere the 3x11 piece together, forming a 3 x 5 1/2 piece of double thickness.
Cut an 1/8" slit along the center fold of the base piece.
Slide the pop-up piece through it and fold the 1/2" tabs up and adhere together, sandwiching the pop-up piece between them.
Slide up the center pop-up piece and adhere the "wings"
Decorate as desired and use the new We R Memory Keepers Corner Chomper to round the edges. You can go through several layers at once!
Have fun and post a link in the comments to a picture of your creations!
I love the idea of Christmas in July! It's the time when I start cooking my ideas for the next holiday. Here's a fun one that will keep your family busy and it makes a great gift. Everyone is looking for ways to give heartfelt gifts and I think you should add this one to your list!
The game is called Convoluted Christmas Carols and the object is to read the very wordy description and guess which Christmas carol it is. I just know that you and your friends and family are going to have so much playing this (my Bunco girls and Angel friends all did!) that I made up these printable free downloads for you! (Scroll down for link.) All you have to do is print the carols out on cardstock, cut out and decorate. There is also an answer key and some printable answer sheets too! Find a cute box to decorate (mine is from Creative Memories tape runners) and you've got yourself a very fun little gift! Enjoy!
Or maybe a quick and easy Thinking of You Gift . . .
I am in the midst of busy summer craziness, but I made a little video to show you how to turn a recycled bottle into a gorgeous and thoughtful little gift.
I just read Regina Brett's 45 life lessons and one of them reads,
"Burn the candles, use the nice sheets, wear the fancy lingerie. Don't save it for a special occasion. Today is special."
So go pick a flower from your garden and make someone's day!


 color, it's very easy. You need to convert the papers to jpeg and use my favorite FREE photo software, Picasa. Here's how: With the Picasa running in the background, open the pdf document and change the view so that the full page can be seen. (It can also be helpful to use F11 for "full screen".) Press Ctrl + Prt Sc, then switch to Picasa and the screen capture should be visible. Use crop to highlight just the paper portion of the image and then save. (The default is to save as a jpg.)