Thursday, April 30, 2009

More DIY Border Punch Styles with Common Scrapbooking Tools


It's Spring! Do you have that itch to get something new? Well, you DO deserve some new crafty supplies, but maybe these NEW IDEAS will suppress the itch a bit. Use what you've got to make some really cool borders that only look like they were done with a fancy punch!


I whipped up these five cards (and a little gift bag to hold them) pretty quickly. It's part of the gift I'm giving the Moms, Grandma and Sisters in my life for Mother's Day. I gave them a card tin like this one a couple of years back and I have to keep it filled!


Here are the border details:


Scor-Pal + Scallop Scissors + Big Bite 1/8
The Scor-Pal has some really handy grooves, like the two right near the 2 inch mark. It's the perfect little touch for this border.


Cloud Scissors + Big Bite1/8 and 3/16
If you missed the video on how easy it is to use the Big Bit's depth guide to line up these holes, go check it out! See what new combination you can come up with!


Scalloped Scissors + Piercing + White Gel Pen
This is so simple, but it gives that pretty, Victorian look!


Scor-Pal + Piercing + Deckle Scissors
This one is fun because it's not so feminine. I have three nephews, so my family uses a lot of boy birthday cards (both to give to the boys and for when those boys' friends have birthdays.)
I used the Scor-Pal lines near the 4 inch mark, which are evenly spaced 1/4 inch apart, then sanded them lightly. This is great with Matchmaker Cardstock. I also added a little stitching and some distressing to the edges.


Scallop Scissors + Bind It All + Ribbon
I think this one is my favorite! You know that the Bind It All can make a really cool notebook paper look, and do a cool trick with ribbon knots, but look how sweet it is with ribbon weaved through it!


I'd love to see what you can make with the tools you have!

PS: I posted the other day that I would give away a prize to someone who took my challenge, but I didn't have any takers . . . .chirp . . . chirp . . .chirp

Wednesday, April 22, 2009

More Fun with Toilet Tissue Tubes


In honor of Earth Day, here are more fun ideas with Toilet Tissue Tubes!


Bind It All Sour Cream Treat
You've see this treat before, no doubt, but adding the tube makes this treat a little more sturdy, so you can fill it with lots of Peanut M&M's or Hershey's Kisses. Punch one side and seal, then punch the other side at a perpendicular angle THEN FILL, add a touch of adhesive and tie with ribbons.


Tissue Tube Blooms
Flatten and cut paper covered tubes into strips about 3/4" wide. Edge them with ink to give a finished look. Punch a hole in one end of each "petal" and string six together with narrow ribbon, leaving ends long enough for you to tie the bloom onto a treat bag, or whatever you would like to embellish. I tied mine the the bag, but only to one side. (The big bite makes it super easy to do this.) With the bloom attached this way, the bag can be opened without being torn apart. This is great for earth day, because the bag can be used more than once! Scrapper's Floss is the perfect finishing touch and is tied around the whole bloom to hold a button and small floral in the center of the flower. (Click on the photo to see a larger image.)

Want More Ideas for toilet paper tubes?

Barb is TP'ing Too!

You can always make more books!

Monday, April 20, 2009

Sweet Thing Card with DIY Border Punch

What a sweet card to send for any occasion! You'll have fun making it too, with my Do-It-Yourself Border Punch technique! (See this Brilliant Inkling Here.)

I love the look of border punches, but I don't have any (and I'm running out of room to store anything new!) so I made this out of what I had on hand:
Big Bite
Fiskars Cloud Sissors


The cupcake is from The Angel Company's Spring into April special, which won't be around after April 30, 2009. The set is called Sweet Thing.

Other touches I love: I made the white dots with my Tombow White Gel Pen. Love it! I also added Prisma Glitter.

The flower and button are from the Ava Embellishement jar (doesn't it look like a little cherry?) and the paper is Catelynne.

Click on any of the product links to add them to your secure shopping cart on my site. Go ahead, you've saved a bunch of money on punches! PLUS, THREE OF THE THINGS THAT MADE THIS CARD SO CUTE ARE UNDER $4!

It's your turn! Leave a comment with a link to a border you've created using different punches. I'll choose a random winner on April 30th for a goodie from me. Maybe a limited edition stamp set . . . .
Monday, March 30, 2009

Floral Vines - Three Techniques to Try

Remember the images I was coloring by the pool? They were from the April Stamp of the Month from The Angel Company, Floral Vines. As a demonstrator, I'm able to order them ahead of time, so I can try out techniques that show how versatile the set is.

Here are three to try:

Quick and Easy Watercolor Pencils - You probably saw my You Tube video with this technique. It's so fast and fun, I used it on this swap card for the Angel gathering in Kansas.

Coloring with Bic Markers - If you're like me and haven't been able to spring for Copics, this is the technique for you. Bic's permanent markers have similar properties and can be blended together for great shading. (Even better: Target and Walmart have big sets for cheap!) On this gate fold card, I used Hot Aqua, Polynesian Purple and Lime Sorbet. The addition of a little shading with a Gray Tombow is the perfect finishing touch!

Magic Chalks - The combination of Versamagic Ink (I used Aloe Vera) and Jewel Tones Pearlescent chalks is magical! See how to achieve this soft effect by watching this quick video. (Click here if the video doesn't appear.)


So, are you sold on this set? It can be yours before April 30, 2009 for $9.75 with a $30 purchase. Better yet, have a show, where I'll demonstrate these or a whole new set of techniques and you could earn one of the Spring Into April sets FREE! If you're not in Denver, Email me to find out how you can have your own Party in a Box!

Tuesday, March 24, 2009

A Place for Great Ideas - Tabbed Composition Book

Great ideas come from everywhere, and if you're like me, they don't come exactly when you need them. I'm not very organized and can't remember great ideas unless I write them down.

This book is a great place to sketch out creative ideas, write business tips, even keep track of songs you want to download and internet passwords. The tabs keep the different types of info organized. I made the one I use last year and I cut the inside pages to allow a protected area for the tabs. On this one, I added chipboard that extends out from the inside back cover and covered it with paper. I used snaps to attach clear plastic to the front cover to protect the tabs and also to cover the metal letters. The plastic (which I saved from the packaging to my daughters toy doll) has a decorative edging, which I created using my cloud scissors and Big Bite. You can check out more details on the "Clever Closure" I made in this post. You can also click this photo to see it in larger detail.

Check out this page from my idea journal. In addition to the sketch for the idea journal, you can see my "Twisted Treat" idea. I had jotted it down after being reminded of the cute sour cream containers I had seen online, but I didn't have an immediate need for that project. When I was preparing for Escape in January and needed a swap idea for Club Med, I went to my journal and found that idea. I switched it up a little by punching the edges instead of crimping them and tied a little ribbon on the end. It's fun to see the ideas I have come to completion and having this little journal ensures I won't lose track of them!

By the way, this journal was my "Prop Swap" which goes to a surprise recipient during our gift exchange. It ended up going to Laura Arnold (Hi Laura!). I never found out if she liked it, but I hope it helps inspire her and keep track of all her great ideas! I received a very inspiring and treasured gift from my friend and first Angel recruit, Camille [That's us dressed in our wings at Seminar a couple of years back]. It's a darling little coaster memory box which reads on the front: "even broken roads lead to RAINBOWS". Isn't it sweet? I'm going to add photos of my kids playing in the rain and seeing a rainbow, in addition to some messages and inspiring quotes.

I hope you're inspired today and that you find a place to keep track of those great ideas!

Monday, March 23, 2009

Refreshed and Inspired

Last week I was squeezing in a little crafting while vacationing with my family. This past weekend was all about renewing my crafting spirit with some fellow Angel gals in Kansas.

I made these little refreshing goodies for the gals I road tripped with and we all got tons of inspiration as we made projects and swapped gifts.

Here's a little peek at some of the gifts from our Saturday night "Prop Swap" gift exchange. Later I'll post the gift I made. It's so refreshing to gather with ladies who share my love of paper crafts. If you live in Colorado, be sure to get on my mailing list (see the link in my sidebar at right) to find out about my events closer to home. I'd love for you to join me and be inspired!

Tuesday, March 17, 2009

Coloring by the Pool


Have you been wondering where I've been? Well, I'm crafting a little, but in different surroundings. My family and I have been on Spring Break in San Diego!

In between the Zoo, Wild Animal Park, Sea World and Legoland, I've been making a few swap cards for my next trip after this one: an Angels only weekend in Salina, Kansas.

After that creative escape, I'm sure to be back with a ton of inspiration. Until then, I'll just leave you with this sneak peek. The image is from the April Stamp of the Month from The Angel Company. Of course, I used the quick 'n easy watercolor pencil technique. Keep your eyes out for more ideas with this set soon. I've got a few other things cookin' . . .

Wednesday, February 25, 2009

More Crafts to Welcome Baby

Baby showers are so much fun! Here are some of the other little goodies I made in preparation for my friend's shower. I love making diaper cakes. I chose a pretty big topper for this one, so I used a whole box of Costco diapers. Do you want a little peek at what's inside? It's my secret weapon: a roll of paper towels! A large stretchy band keeps the diapers in place while I position them around the paper towel roll and then tie ribbons around each layer to hold them together. for the top layer I used an empty roll that I wedged inside the roll below to form a sturdy center for the top layer.

For favors, we made these pretty candles. The tulle rounds that you get in the wedding section wouldn't quite wrap around the whole candle, but my friend Heather suggested tying them with a little ruffle of tulle sticking up and she was right, they looked darling!

Mix and Match Phrases
One of my favorite Stamp sets is Ordinary Greetings. It is so versatile. To customize phrases further, I cut the words apart to make a whole new phrase! See how the original phrases were "Oh Baby" and "Welcome to the Family". I was able to stamp "To Welcome Baby," which worked perfectly for my cake tag. Gotta love unmounted stamps! I used the same greeting set for the candle tag, along with another versatile set, Mini Occasions. Between those two sets, you could make greetings for almost any event!

Thursday, February 12, 2009

Quick N Easy Watercolor Pencil Tutorial

Semi-Hand-Stamped Strikes Again!
Are you the crafty one among your friends who gets elected to help with things like shower invitations? Of course you are! And do you love every minute of it? Sure, but, you are a busy gal. So start with some of Mabelle's beautiful stamps from The Angel Company. She has seven new sets! Her coloring is so beautiful. You'll definitely want to check out her colored samples and emulate her style for the card that will be presented with your gift.

Now, back to those invitations. You have to go Quick & Easy! Start with some inexpensive cards (like these) that you can run through your computer for the invitation details and add a special touch with Watercolor Pencils. They are really easy to use. Check out this video for some tips. (Click Here if the video doesn't appear.)

Get the Goods
Click on the item name and add these basics to your shopping cart:
Prismacolor H2O Pencils
Dove Blender Pen
Refill Solution
Gray Tombow Marker
Crystal Stickles

NEW! Special Delivery Stamp Set
The set used in my sample was discontinued (R2000 Special Delivery), but it is my favorite and I love it. (Check ebay!)

Are you loving the Semi-Homemade idea? Click here to see more!

Tuesday, February 10, 2009

Valentine Boxes


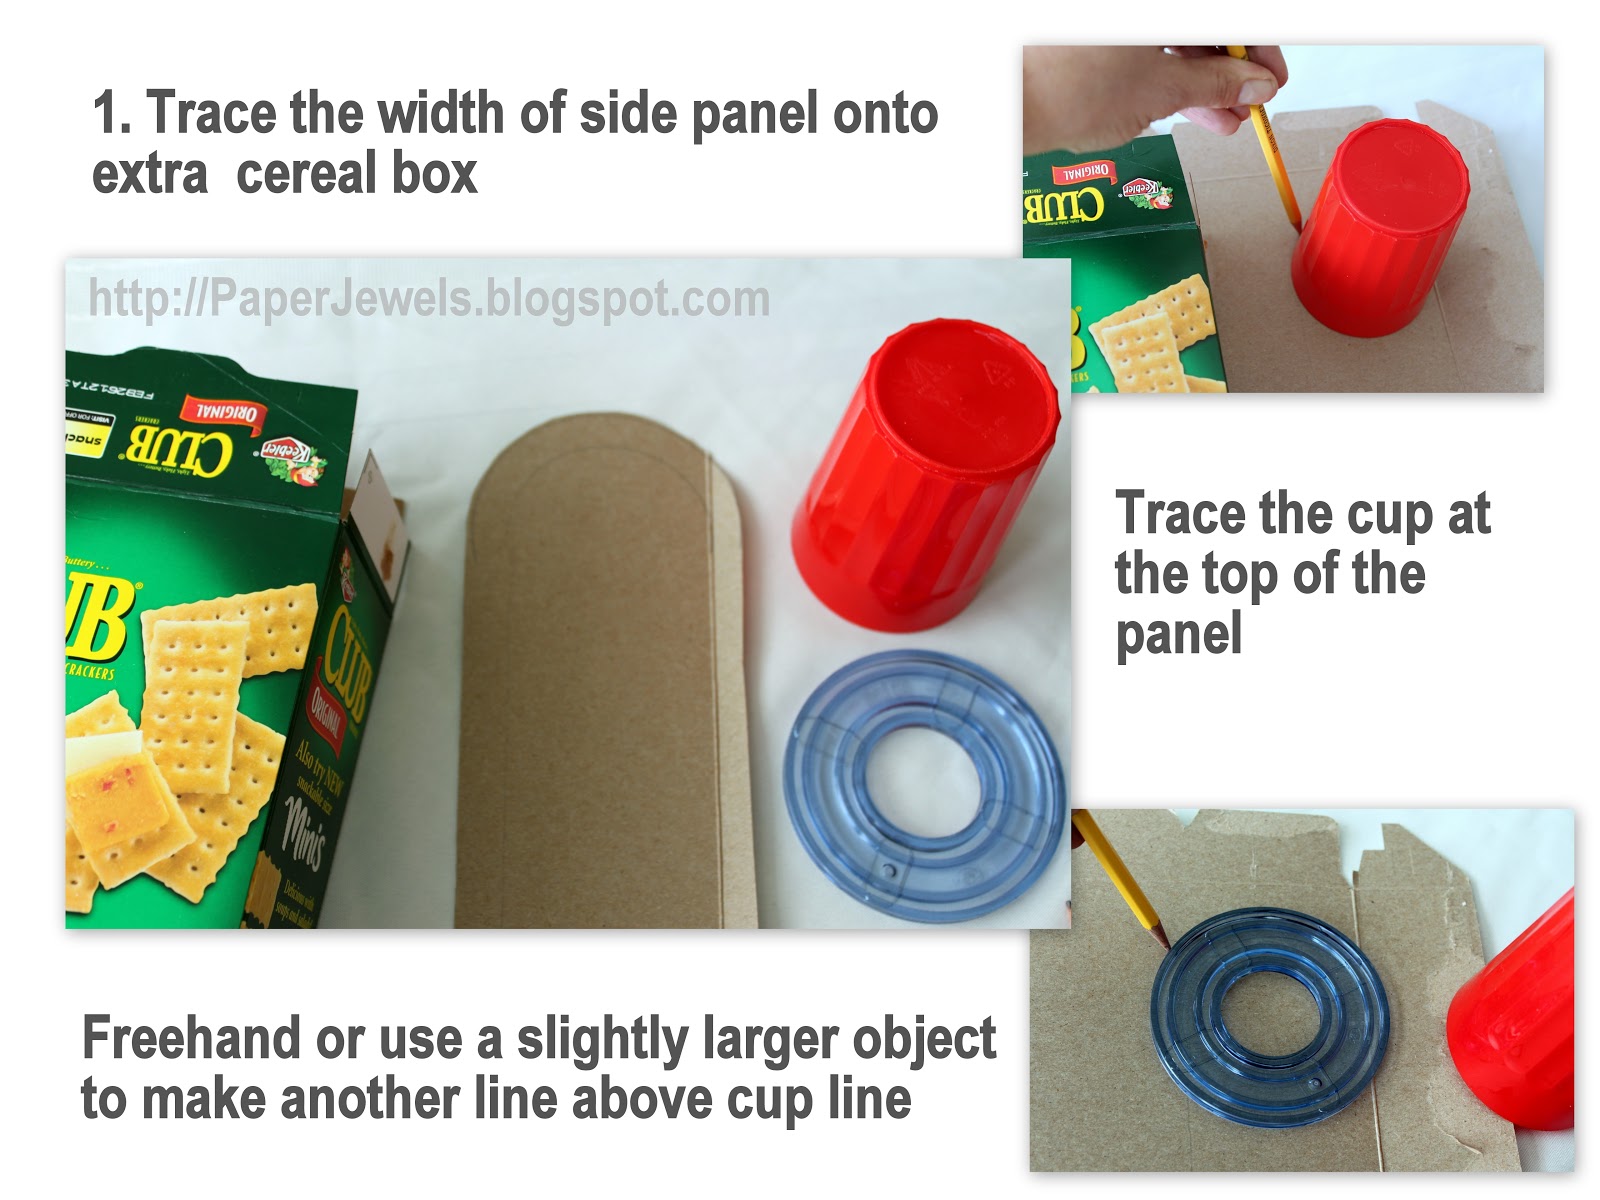
Do your kids make boxes to bring to class for their valentines? Here's what my girls and I came up with last night. Katelyn's is made out of a frozen waffle box and some extra cereal box for the rounded top. It's reminiscent of the street corner type mailbox. Isn't the flap cute?
{Instructions below!}


Lily's preschool class has six students, so this cereal box turned ipod is just the right size. Katelyn gave me the idea to make earbuds out of two foam hearts stuck together. Isn't she a paper crafting genius? I wonder where she gets that from?


So here are instructions on how I made the Valentine Mailbox:


Happy Valentine's day!