Have you ever browsed through a scrapbooking magazine and wondered about the story behind the pages you see in articles and advertisements? I don't mean the journaling (although I sometimes wonder about that too if there isn't much written on the page.) I always wonder about the scrapbookers who made those creations and what their story is. Are they professionals? How did they get their work noticed?
Well, I can tell you one story about page 12 in the November/December issue of Simple Scrapbooks magazine.
That's my daughter, Liliana, making a cute kissing face. I snapped that photo last Christmas while we were visiting our family in Central New York from our home in Colorado.
That page and the CD mini book that is also featured on that page were made during my assignment to create a showcase display of the Reece Soar With It Collection from The Angel Company. The colors and patterns in that paper are great for the holidays and beyond. When I saw that striped pattern, I immediately thought of Lily's striped hat. There are also lots of circles in Reece, so most of my creations had a circular theme. (Scroll down for some round ideas and inspiration.)
How did I get noticed? Well, as a demonstrator with TAC, I've gotten to meet many of the people that are "behind the scenes" at events and all demonstrators are invited to submit art for contests and for the bi-annual Inspiration Book and Catalogue. As far as being published in a magazine, I guess it's a little bit of luck. The magazine is about designs that are a little more simple, and I'm all about simple. It's fun to see some of the elaborate designs in magazines, but in the end, the layouts that get done and in your book are the ones that are really enjoyed.
More Circular Inspiration
Circles are so fun to add to your scrapbooks, although they can be a challenge too. Two easy tools for making circles are the Coluzzle (a plastic template with several concentric channels of the same shape that you cut through with a swivel knife) and a plain old compass works great too. That's what I used for my huge circle on the 12x12 "Cherished" layout.
Need layout ideas? Check out the Round Maps in the Archives at Becky Fleck's Page Maps site.
Wednesday, November 19, 2008
Saturday, November 15, 2008
Semi-Hand Stamped for a Craft Fair
My son's Cub Scout den had a bake sale at a local craft fair to benefit a nearby animal shelter. Our den leader mentioned that if we had anything else to donate for the booth to bring it, so my first thought was teacher and co-worker gifts. You've probably seen the CD Case Calendar (case opens, flips around and stands on desk) and Sticky Notepad Covers. Don't they look great in Penelope paper from The Angel Company(tm)? I love how the colors go from fall into the holidays and really, are beautiful in every season. (Go Here to print your own pdf calendar pages for your holiday creations.)
I don't do a ton of baking, so Heather gave me the brilliant idea of doing some peanut and candy corn treats. All I could find were the caramel and caramel apple kind, but the colors are gorgeous, they were half off (already!) and they actually taste great with peanuts. If you've never tried this sweet and salty treat, you should.
Semi-Hand Stamped Bags
A pretty package just adds to the gift, so here's where the Semi-Hand Stamped thing comes in. For at least a year now, I've been talking about paper crafts that are semi-homemade and it just occurred to me that semi-hand stamped is an even more fabulous term for the idea! I started with these lunch bags that were inexpensive and fun, but a little bright. I really needed to tie the orange and white flowers in with the rich burgundy color in the gifts, so I used my Petal Pack stamps to add pretty centers with Palette Bordeaux. This worked perfectly!
Want to show your thanks with semi-hand stamped crafts? Here's what you need:
Penelope Soar With It Collection
Penelope Cardstock
Penelope Ribbon
Bazzill Bitty Blossoms (I also cheated by plucking some petals from some Walmart silk flowers)
Always Remember Stamp Set
Book Rings
Post It brand recycled notes (4"x4")
CD Cases and candles from Big Lots
Friday, November 7, 2008
All About Fall Sidney Circle Album Kit
The colors of Fall are so rich and warm, and are captured perfectly in this paper!
To make my All About Fall album, I used a circle tin,which is a great way to store your album, plus a fun item to embellish. The kit i got includes a die cut circle that matches the lid perfectly. It's so easy to whip up a perfect gift or treasured memento for yourself. I even added some journaling inside the tin. To take a peek inside my album, check out my video:
If you're in a reader or the video doesn't appear, check it out here.
Leave me a note and let me know what you're crafting up for fall!
Tuesday, November 4, 2008
Cards Pretty Quick
I love Heather's sketches because the cards go together quick and always look special. I had a couple to make today, so I knew right where to go for inspiration! I made my thank you cards and a couple of birthdays while I was at it to get ahead a little.
Are you short on stamping time, but need special cards? Don't let what happened to me with the store bought card happen to you. Start with some blank cards and use your Cha Cha Soar With It Collection from The Angel Company. The classic colors and artistic patterns can go masculine or feminine and it works for so many seasons!
______________________
Throw it in your Cart:
Cha Cha Soar With It Collection
Goes Great With:
Cha Cha Ribbons
Eva Embellishment Jar
Orange Peel Stickles (or Chrismas Red)
______________________
Go Into Mass Production with Sheetloads
Do you really want to get ahead on everyday cards or get going on your Christmas cards? Check out SheetLoad of Cards. Their November 2008 issue is ready to download and features a detailed cutting guide and instructions to make dozens of looks with one basic design. It also highlights all TAC products. What a great way to get a lot done in a little time!
Make it More Merry
Are you inspired to get started on your holiday cards? It's much more fun to get crafty with friends! If you're in the Denver area, join me at Joy Lutheran Church, 7051 E Parker Hills Ct
Parker, CO 80138 (Click Here for Map)
It's FREE and all the instructions and materials are provided for you to make 5-10 (or more) cards. A few of them go to the church's card sale and you keep a couple to take home. The designs are so inspiring and we could really use your help. Bring a friend; the more the merrier!
Are you short on stamping time, but need special cards? Don't let what happened to me with the store bought card happen to you. Start with some blank cards and use your Cha Cha Soar With It Collection from The Angel Company. The classic colors and artistic patterns can go masculine or feminine and it works for so many seasons!
______________________
Throw it in your Cart:
Cha Cha Soar With It Collection
Goes Great With:
Cha Cha Ribbons
Eva Embellishment Jar
Orange Peel Stickles (or Chrismas Red)
______________________
Go Into Mass Production with Sheetloads
Do you really want to get ahead on everyday cards or get going on your Christmas cards? Check out SheetLoad of Cards. Their November 2008 issue is ready to download and features a detailed cutting guide and instructions to make dozens of looks with one basic design. It also highlights all TAC products. What a great way to get a lot done in a little time!
Make it More Merry
Are you inspired to get started on your holiday cards? It's much more fun to get crafty with friends! If you're in the Denver area, join me at Joy Lutheran Church, 7051 E Parker Hills Ct
Parker, CO 80138 (Click Here for Map)
Stamp for Joy!
Thursday, 11/6 7-9 pm (Nursery Provided)
and
Friday, 11/7 1-3 pm
It's FREE and all the instructions and materials are provided for you to make 5-10 (or more) cards. A few of them go to the church's card sale and you keep a couple to take home. The designs are so inspiring and we could really use your help. Bring a friend; the more the merrier!
Sunday, November 2, 2008
Sizzix Bat Wings & Mummy Cans
Sizzix makes a die for bat wings? Kind of. I know Halloween is over, but if you are like me, each holiday goes by so fast that you didn't have time to do all the things you wanted to do. Just file those ideas away for next year and you're ahead of the game, right!
So, I had a cute Cha Cha treat container that Shayla gave at last year's seminar and I spooked it up with a TAC GWP stamp and altered the Sizzix Holly & Berries die cuts to make little wings. So fast & fun!
Mummy Cans
My kids and I had been collecting lots of tins this fall to use as treat cannisters. We wrapped them with white streamers, inked them up a little with Palette Cognac and added little googlie eyes. Inside the cans were our chocolate covered pretzels. Yum.
Our tags were made with black cardstock and some Miss Moxie paper. Who knew this pretty paper would work so well for Halloween? Stock up for your spooky scrapbooking and you can use the leftovers for spring! For more Miss Moxie ideas, see:
- Halloween: Big Book vs. Mini Book
- Miss Moxie Photo Cube & Scrapbook
- Composition Book with Clever Closure
- Die Cut Flower Card
- Miss Moxie Mini Scrapbook
- Get Well Goody
To see more fun things the kids and I did this fall, check out The303Grifffiths.blogspot.com. We'll have you collecting all your recyclables, like jars for Jack-O-Lantern Jars and milk jugs to make our spooky ghost faces!
Monday, October 13, 2008
Stamped Boo Treat Bags
We love to Boo. Do You?
Yes, our neighborhood does that fun Boo game and I finally got my treats done! I had been looking for something cute to hold my big bunch of treats and finally I decided to stamp on white bags.
I started with the fun tissue paper and made my bag to match. (I like to call this Semi-Homemade gift packaging.)
I also did something different and fun this year. I Boo'd my own kids! I snuck outside, left the treats at the door, rang the bell and ran inside through the garage. I got to stand behind them just as they were discovering their treats. Katelyn said, "Those are from Mommy! Those are her stamps!". Smart girl!
Want more Semi-Homemade Gift Packaging?
Baby Thank You's with Card Keeper
Elegant Semi-Homemade Wrapping Paper
Card and Notepad Folio
Tuesday, October 7, 2008
TAC's Penelope Bind It All Book
The Angel Company now carries the new Bind It All V2.0, that cuts thicker materials and has an improved guide for making multiple cuts.
This project, from TAC's Annual Seminar is a great example of the chunky things you can bind with the BIA. A Maya Road Chipboard Book was taken apart, covered with Penelope Paper and bound so that the pages flip this way and that. It's a super fun book that I used for some of my favorite Yellowstone photos.
Here are some pages from the book. (Click on the photo to enlarge.)
Wednesday, September 3, 2008
Miss Moxie IS Halloween Paper & Other Fun Ideas
Looking for something SPOOKY in your collection of scrapbooking paper to make Halloween goodies and greetings? It right there, in with your springy colors. It's the Miss Moxie Soar With It Collection from The Angel Company! Yes, I know it's great for girlie things, summery things--and spring too. Just ink it up, and look how creepy and fun it looks!
Big Book or Mini Book?
How do you like to scrapbook? Why choose? I do some of both. For these photos, I wanted a little mini book that is a memento and a decoration, as well as a layout for my big book that documents last year's fun.
My 12x12 spread is done with another versatile collection: Cha Cha. It's a more natural choice for fall, but great for any season!
Both of these projects were TAC Studio designs that we completed at The Angel Company's Annual Seminar. [You know, Being An Angel Really is More Fun!(tm)] I just happened to choose Halloween, but can't you see them for spring and summer too?
More Cha Cha & Miss Moxie Projects for Every Season:
- Summer Cha Cha 12x12
- Cha Cha for Fall Layouts
- Kids' Table Collection
- Composition Book with Clever Closure
- Daffodil Card with Miss Moxie
- Miss Moxie Mini Scrapbook
- Get Well Goodie
Links to the supplies in my Online Shopping Cart
Miss Moxie: Paper Collection, Cardstock and Hardware
Cha Cha: Paper Collection, Cardstock, Hardware
Other Must Haves: Black & White Ribbons, Black Cardstock Strips, and Scrapper's Floss (There are lots of colors, but I like LIME, LAVENDER, BLACK and RED)
Get $30 in goodies and you earn a free stamp, like the Halloween/Boo one used on my mini book. So fill up your shopping cart and be sure to copy and paste it into an EMAIL to me to get this little treat!
Thursday, August 28, 2008
Willoughby Decoupage Chalk Board
I'm still working from room to room, adding a little "freestyle" redesign as I go. The idea is to update using things around the house and adding paint, or in this case some beautiful paper to make something new.
Today I'm working on my laundry room, which is the room we most often enter and exit the house. It's a perfect place to leave little reminders that we will see before heading out the door.
I found this chalk board at Target and I switched out the shamrocks for some Willoughby paper from The Angel Company. I also added some Post Its and a marker, attached with a paper-covered binder clip. It's for notes that needs to be brought along, like a phone number or directions. The wooden letter was on clearance in the baby section of Wal-Mart and I spray painted it espresso. The tags come in the paper pack and coordinating ribbons and hardware are available as well.
Willoughby Ribbon
Antique Copper Hardware
decoupage glue
binder clip
scissors
stamps and ink
I am not a naturally organized person, but I'm trying new things to add a little more sanity to my family life. The hooks in the photos below are part of what is referred to in one of my organizing books as a "launching and landing zone." So my library bag will hang here to remind me to grab it and go! The letters which are above hooks on the opposite wall are for my kids' names to hang things that would otherwise "land" on the floor. You'll also see my framed Wordle and kids' portraits that also got the espresso treatment. The You picture is one of my favorite pages of Katelyn that was in the Spring/Summer 2008 TAC Inspiration Book. I hope this inspires you to do some freestylin' around your house. Leave me a comment and a link to your favorite decoupage or freestyle project!
Today I'm working on my laundry room, which is the room we most often enter and exit the house. It's a perfect place to leave little reminders that we will see before heading out the door.
I found this chalk board at Target and I switched out the shamrocks for some Willoughby paper from The Angel Company. I also added some Post Its and a marker, attached with a paper-covered binder clip. It's for notes that needs to be brought along, like a phone number or directions. The wooden letter was on clearance in the baby section of Wal-Mart and I spray painted it espresso. The tags come in the paper pack and coordinating ribbons and hardware are available as well.
Supplies:
Willoughby Soar With It CollectionWilloughby Ribbon
Antique Copper Hardware
decoupage glue
binder clip
scissors
stamps and ink
I am not a naturally organized person, but I'm trying new things to add a little more sanity to my family life. The hooks in the photos below are part of what is referred to in one of my organizing books as a "launching and landing zone." So my library bag will hang here to remind me to grab it and go! The letters which are above hooks on the opposite wall are for my kids' names to hang things that would otherwise "land" on the floor. You'll also see my framed Wordle and kids' portraits that also got the espresso treatment. The You picture is one of my favorite pages of Katelyn that was in the Spring/Summer 2008 TAC Inspiration Book. I hope this inspires you to do some freestylin' around your house. Leave me a comment and a link to your favorite decoupage or freestyle project!
Tuesday, August 26, 2008
Nick's Bind It All Mini Scrapbook
My nephew Nick and my son are like peas and carrots. I made this mini scrapbook out of decorative manila folders to remember the fun we had during his recent visit.
I bound folders from Wal-Mart and photos with my Bind It All machine, which is great for mini books! I also added office-supply type elements with my Sizzix using the leftover from the folders. Inside are acetate pages, which I stamped with StazOn or just wrote on with a Sharpie marker. I like how it has a boyish, "unfancy" feel. The photos inside are adhered back to back, so it's super simple to put together, but very sturdy. (Click the photos at left to see more detail.)
Tabs made with my Mini File Tab punch are stapled here and there to label events and locations. (Check out this tip for making just-right sized tabs.) They were also made from my folder scraps. You'll also notice I made my favorite "faux notebook paper" by punching the white title card on the front of the book in my BIA and snipping away a bit of the paper with scissors.
Measurements:
Covers: 8 1/2" x 6 1/2"
(Photos are 4"x6")
Tips:
4x6 photos are super easy to punch perfectly, because they center perfectly into the machine. I made my covers to fit two pictures wide, plus a little space in between. When making a book larger than 4 inches, you'll need to make more than one set of punch holes in order to put the book together.
I opted to do one set close to the top edge and one set close to the bottom edge of the book. I also wanted the cover to hang over just a little from the pictures, so when I placed the cover into the machine, I left just a little space along the edge.
I used pliers to snip the wire into two pieces. There's no need to measure, just count the number of holes (6) and prongs to determine the proper size.
The Bind It All not only punches the holes, but closes the binding wire, forming the book. If you'd like to see it in operation, click here.
If you're already impressed and you want to get one HALF PRICE, host a show with TAC. Just a $100 party earns you a half price item, free hostess set, plus your entire order at 20% off. Not in Colorado? No problem. I'll send everything you need for a Book Show. Email me for more info.
Wednesday, August 20, 2008
CD Photo Cube Carnival
I was featured as a guest blogger on the Databazaar Blog, so I thought I would celebrate with a CD Cube showcase!
I've seen so many great variations on this project since I first posted it, so I thought I would share with you some of my favorites. The following gals did some really cute cubes:
Live, Laugh, Love with Lunar Lana
Le Scrap de Sylvie du Havre
Diane with ScRaPIt
Carol at Stampin Hot in Arizona
Bloggin with Bobbi
Bunny Cates
I also got some great tips:
Our Angel Beth Green made a pencil caddy for her hubby's desk and filled me in that a cardboard frap holder fits perfectly inside the cube. SWEET! How about making one of Stephany's Yummy Cocoa Kits and giving it with a photo cube for a fun holiday gift! My personal favorite way to decorate your holiday gifts is with The Angel Company's new Reece Soar With It Collection. {wink}
Some people are using their cubes to hold things, like tissue boxes, Bobbi's so-chic greenery centerpiece shown in the photo above and I loved RuthieB from SCS's idea of having holiday cards on display at Christmas time! Tonniece (see her link below) made her cube into a votive holder by using vellum inside her cube. Brilliant!
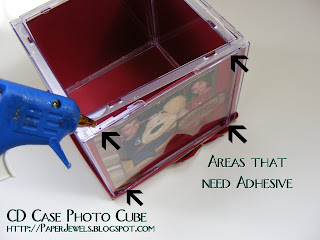
I also got a lot of questions about holding your cube all together, so I wanted to post one more instructional photo about adding adhesive to keep your cube sturdy. Whether you use a temporary tape solution or your good old glue gun, refer to this photo and to the original You Tube Video or John Wik's original Instructable for the details on making your own photo cube.
Have you crafted a cube? Use my Mr. Linky to show us your stuff! (If you're using a reader, click over to my blog to use this feature.) Be sure to leave your name and use the link for your particular post (permalink) so visitors will be sure to see your creation.
Crash course on Mr. Linky HERE
Tuesday, August 19, 2008
Freestylin'
Have you seen that show on HGTV where they rearrange the stuff you already have to redesign your rooms? Well, that's kind of like what I've been doing around here. In the last couple of weeks (while my blog has been quiet) I've been getting ready to have family in town and then was busy making the summer memories to go inside the scrapbooks. {wink}
It all started with this piece I made. John told me he'd love to see more of my work framed around the house, so I've been converting some of the art on our walls to more personal art--moments I've captured that I want to be reminded of around every corner.
This piece was for Lily's room. She has just turned three, so the Beatrix Potter prints have been replaced with some more girly, flowery decorations. She seems to be pretty happy about it.
Do you recognize the pink flower wall decoration? Yup, it's the flower coaster from Barb's challenge!
Here's something else that I thought was fun. You saw Heather mention it, but were you curious about how my Wordle came out?
I went to http://wordle.net/ and I pasted in the text from our last three holiday letters. This cloud shows you what words I use most to describe my family life. Interesting, huh? I spray painted a frame espresso brown and hung this in my powder room. Now I'm on a kick to add personality to every room. I'll keep you posted . . .
Thursday, July 31, 2008
Make Your Own Flowers - Coffee Filter Edition
I've seen some super cute ideas lately for making your own Prima flowers and felt flowers, so I thought I would share another idea I got from my friend Leslie. This is super cute and super frugal--it's coffee filters!
Tips:
You can use a variety of die cutting tools. If you use a punch, you'll want to use the more sturdy size 4 cone cofee filters. For the Cuttle Bug, Quick Kutz, Side Kick and bigger Sizzix machines, anything goes. I especially like the Big Shot type dies because you can fold a stack of filters into a triangle shape to focus on one portion of the die and going through lots of layers. This makes a ton of flowers in a hurry!
Ink them Up!
Another tip is to ink the edges, dye the whole flower with re-inkers or stamp on the flowers. You can achieve so many looks by adding a little ink!
Check out the samples below for ideas on mixing coffee filter flowers with paper, cardstock, Bazzill Bitty Blossoms or other flowers.
Finish them Off!My favorite way to give flowers the finishing touch is with a fun brad.
Friday, July 25, 2008
Circle Sketch on a 12 x 12 Layout
This layout was featured at The Angel Company's seminar as part of their Reece showcase, and will be on display at the scrapbooking shows TAC is participating in.
I had fun playing off the circles in the Reece paper and on this new set, Affirmation Badges, but I wanted to do a square page. (It fits better into an album.) So, I just used a circle sketch and put it on top. There's a lot going on, but I think you still notice the smiles. This is my daughter Liliana and me while visiting New York for the holidays last year.
To make the word "cherished" really stand out, I stamped once on a darker paper and once on a lighter, cut out the section with the word and popped it up.
When I first started scrapbooking, handwriting idea books and plastic templates to draw and cut out all sorts of shapes were all the rage. I also bought a bunch of these "Border Buddies" that had unique edges you could trace along and/or cut out. So, as a nostalgic touch, I used an edge that is kind of scalloped shape--kind of like a parenthesis mark. I think I like it!
Click on the photos below for more detail. I used my white Extreme Gel Pen to color in the little flowers of my Floral Labels journaling block. I like that little touch. Ciao!
Wednesday, July 23, 2008
Holiday Ornaments
These are fast, fun and frugal. In fact, they would be great for kids' projects. If your kids are bored this summer, this would be a good way to keep them busy and get a jump on little teacher, grandma and neighbor gifts. (Mine are in school right now on their year-round schedule but off all of December, so I'll tuck this idea away with my other kids' holiday ideas.)
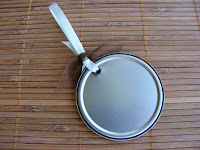
Anyway, the first one is made with juice lid. Save all those lemonade lids now! Just a couple of punched circles, some hardware and ribbon and you're done. (Remember Barb challenged me to come up with a project with those lids?) I also added a little tag I made with some frosty acetate I had hanging around.
The second one uses a 6x6 square of cardstock and a Scor-Pal. Jen Young did a tutorial at the Scor-Pal site. For a printable copy, click here. It's really very easy to make. I also did a version with burgundy paper and shaped it to look like a poinsettia flower.
Supplies (Click to view product or Order)
Stamp Set: Vintage Chrismas
Paper: Reece Soar With It Collection and Cardstock
Inks: Palette Bordeaux, Versamagic Jumbo Java
Accessories: Reece Ribbons and Antique Copper Hardware
Subscribe to:
Posts (Atom)