Pages

Sunday, May 24, 2009

EZ Dahlia Gift Card Holder with No. 10 Envelope

This is the perfect way to present a gift card and it's so easy to make! If you missed the instructions on how to make the cute flower petals using a heart-shaped punch, check it out here.

The flower center is from Hello Sunshine, which is only available for a few days, so get it quick!

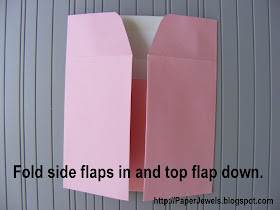
If you haven't made one of these cute enclosures before, you might be surprised that there's a plain old #10 envelope under there! Grab your Scor-Pal and check out the easy instructions, below:


Tuesday, May 19, 2009

Easy Dahlia Flower Card with Tutorial

Do you have a ton of end of the year cards and gifts to give? Here's an idea:
Special Doesn't Have to Take Forever!
I made this easy dahlia flower with a circle and heart shaped punch. Check out the video here:
EZ Dahlia Card Tutorial

One of the things that makes this card easy is that it's Semi-Hand Stamped. If you hang out here, you've seen this idea before. Check out these past posts that start simple but have added sparkle:

Pre-Printed with a Personal Touch
Keep an eye out for notecards on clearance and make them more personal with hand stamping or added embellishment:
Cards As Gifts
Quick Card Keeper

Inkjet Printable Notecards
Invites or Thank You's for a Baby Shower
Notecards for a Teacher

Dressed-Up Gift Bags
Boo Bags
Fall Floral Bags

Sunday, May 17, 2009

New Card Size with a Flat Ribbon Trick

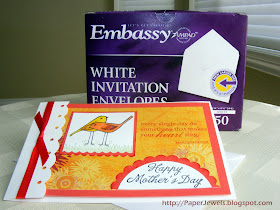
I get some of my basic card-making supplies at Wal-Mart and I noticed they replaced their A2 envelopes with a new size that will accommodate a 4x6 photo.

This got me thinking about using my 12x12 papers and cardstocks for card-making, since 4 and 6 are multiples of the standard 12x12. (I love it when paper is used most efficiently!) I cut two 4.25 x 8.5 pieces from a standard 8.5 x 11 (the all-time most economical cardstock size) which leaves some scrap for making your focal points.

The white piece is folded at 6.25 and the colored pieces (the red one is 4.6) are adhered under the folded flap.

I used my DIY Border Punch technique to pretty up the edge and also a Flat Ribbon Trick, which I learned from my friend Carol from our church card-making group. It uses ribbon the most frugally and you always have a flat and neat looking knot. It's such a great trick, I made a Brilliant Inkling Video to show you how to do it!

I think I'll like this new card size. What could be better, at Mother's Day or any time of year, than getting a card with a snapshot of a smiling grandkid or three? ;)

Brilliant Inklings
[bril-yuhnt ingk-lings]
- noun
  1. a YouTube series of under 2-minute videos
  2. a quick tip to add sparkle to your paper crafts
To see all my video gems, click here.

Wednesday, May 13, 2009

Making and Selling Cards

I've had lots of interest in the card-making ministry at church, so I thought I would share a card idea with you and tell you more about our group.

If you make cards to sell, try this fun and easy (3.75 x 8.5) card. It's great for TAC's Wing It pads and can be customized, which customers will LOVE. They want that handmade, personal quality, so they can give this card to a grandpa, dad, uncle or brother with this option:

Fill-a-Phrase Stickers
I used 1/2" x 1 3/4" labels (Avery 8167) and stamped them with masculine family member names. The stickers are clipped to the card and the small tag is perfectly sized for them to just choose a sticker and add that personal touch!

On a Mission to Make Cards
I was just visiting with some of our group members about how many people all over the country have been blessed by our cards. We have a set night that we make them and we have three large card racks to display them, with a locked drop box for donations. They are $3 or 2 for $5 and we are constantly surprised by how many we "sell" every month.

Volunteers provide the designs and materials, so it's free for participants and they get to keep one card for every five they make. (We usually only make a few of one style.) It is so much fun and it has grown over the five years we have been doing it. If you have been thinking of doing something like this with your church or organization, you should jump in! Schedule a night and look for a card rack and you're in business. Let me know how it goes!


Tuesday, May 12, 2009

Hello Sunshine


This is a simple card I designed for our card ministry at church. We get together every month and replenish the card racks that are on display in our fellowship hall. Donations from the card "sales" go to various charities within and outside of our church.

I thought this card was fun because I was able to easily paper piece the center using a punch. I wish all stamps from The Angel Company were designed this way, so that where possible (circles, squares, flowers, scallops) the parts could just be stamped and then punched out. That is what I call simple, smart and sophisticated!

Monday, May 11, 2009

Earth Day + Mother's Day = Kids' Art Tote

It's not a paper craft, but it is another great idea that mixes sentimental with practical. I photograph my kids' art so that it won't overtake my refrigerator and so that I can display it on our family blog.

I was looking for another way to share the kids' art with far flung relatives and with everyone going green and using reusable shopping bags, I thought this would be a perfect Mother's Day gift!

I used my favorite (and FREE) photo program, Picasa (you can get this at Google.com) to create a photo collage. Then I printed it on the photo iron-on paper, and put it on these canvas bags I found at the discount store. (There is one other tiny detail that is important if you are printing any typed words: you need to flip the photo so that it's a mirror image. You can't do this in Picasa, so try adding the image to Microsoft Word or my other favorite free photo program, Photoscape.)

Photo collages can also be added to things like mugs, by ordering from an online photo lab. I love mixing something practical with a sentimental reminder of loved ones and I know these totes will be treasured! I sent them to the moms and aunts in our family, but this would be a great gift for a teacher or Scout leader as well!

Monday, May 4, 2009

Design Your Own Fabric (Stamping Technique) and Sewing Kit in a Jar


I'm making lots of homemade gifts at this time of year for teachers, mothers, sisters etc. and most of them are made from paper. Here's one that I think you'll love that required some fabric, which I wanted to match The Angel Company's beautiful Mimi Paper.

It was so simple to make my own, using a variety of stamps. The TAC catalogue gives a list by each paper line of what ink will coordinate, so I just stamped away and I LOVE how it came out! I got this Sewing Kit in A Jar idea from Martha Stewart, but I dolled mine up a little more. I used feminine words and my mini alphabet to make phrases like, "Sew cherished" and "Sew delightful" and, of course, "Sew Loved." I hope these gifts will be the perfect blend of sentimental, yet useful.

The pincushion top is made by adding the fabric and some batting to the mason jar lid. If you peek under the lid, there is a pretty needle holder. I made that by punching two circles of cardstock and scoring one of them on my Scor-Pal. Place the circle at the 1 inch mark and score at 2 and 2 1/8. Rotate the circle 180 degrees and repeat, then fold and adhere to the other circle for strength. Hot glue everything together and add some ribbons and buttons, just for fun!

Inside the jar, I'll stash scissors, thread, buttons and safety pins. This will be a perfect kit to keep at a desk or in the kitchen, so you don't need to get your big sewing basket for a quick repair. I'm keeping one for myself and of course, when my daughter Katelyn saw these, she had to have one too! Have fun making these for everyone on your list!