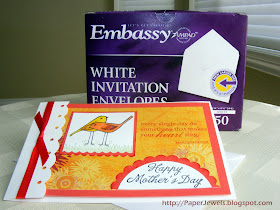
 I get some of my basic card-making supplies at Wal-Mart and I noticed they replaced their A2 envelopes with a new size that will accommodate a 4x6 photo.
This got me thinking about using my 12x12 papers and cardstocks for card-making, since 4 and 6 are multiples of the standard 12x12. (I love it when paper is used most efficiently!) I cut two 4.25 x 8.5 pieces from a standard 8.5 x 11 (the all-time most economical cardstock size) which leaves some scrap for making your focal points.
The white piece is folded at 6.25 and the colored pieces (the red one is 4.6) are adhered under the folded flap.
I used my DIY Border Punch technique to pretty up the edge and also a Flat Ribbon Trick, which I learned from my
 friend Carol from our church card-making group. It uses ribbon the most frugally and you always have a flat and neat looking knot. It's such a great trick, I made a Brilliant Inkling Video to show you how to do it!
I think I'll like this new card size. What could be better, at Mother's Day or any time of year, than getting a card with a snapshot of a smiling grandkid or three? ;)
Brilliant Inklings
[bril-yuhnt ingk-lings]
- noun
- a YouTube series of under 2-minute videos
- a quick tip to add sparkle to your paper crafts

Thanks Julie for the very cool idea. And that size envelope doesn't 'need' extra postage (unless it is bumpy and lumpy, but then the A2 sized envelope would need extra postage too).
ReplyDeleteLove the tip and your video! Great news about the new envelope size! Love your blog so much!!
ReplyDeleteneat size and like the way it comes together, love the tip on borders and the ribbon too, tfs!
ReplyDeleteThank you for the flat ribbon video! I have been struggling with making little bows for my cards and I can't wait to try this trick on my next card!
ReplyDelete