Thursday, August 28, 2008

Willoughby Decoupage Chalk Board

I'm still working from room to room, adding a little "freestyle" redesign as I go. The idea is to update using things around the house and adding paint, or in this case some beautiful paper to make something new.

Today I'm working on my laundry room, which is the room we most often enter and exit the house. It's a perfect place to leave little reminders that we will see before heading out the door.

I found this chalk board at Target and I switched out the shamrocks for some Willoughby paper from The Angel Company. I also added some Post Its and a marker, attached with a paper-covered binder clip. It's for notes that needs to be brought along, like a phone number or directions. The wooden letter was on clearance in the baby section of Wal-Mart and I spray painted it espresso. The tags come in the paper pack and coordinating ribbons and hardware are available as well.

Supplies:

Willoughby Soar With It Collection
Willoughby Ribbon
Antique Copper Hardware
decoupage glue
binder clip
scissors
stamps and ink

I am not a naturally organized person, but I'm trying new things to add a little more sanity to my family life. The hooks in the photos below are part of what is referred to in one of my organizing books as a "launching and landing zone." So my library bag will hang here to remind me to grab it and go! The letters which are above hooks on the opposite wall are for my kids' names to hang things that would otherwise "land" on the floor. You'll also see my framed Wordle and kids' portraits that also got the espresso treatment. The You picture is one of my favorite pages of Katelyn that was in the Spring/Summer 2008
TAC Inspiration Book. I hope this inspires you to do some freestylin' around your house. Leave me a comment and a link to your favorite decoupage or freestyle project!


Tuesday, August 26, 2008

Nick's Bind It All Mini Scrapbook

My nephew Nick and my son are like peas and carrots. I made this mini scrapbook out of decorative manila folders to remember the fun we had during his recent visit.

I bound folders from Wal-Mart and photos with my Bind It All machine, which is great for mini books! I also added office-supply type elements with my Sizzix using the leftover from the folders. Inside are acetate pages, which I stamped with StazOn or just wrote on with a Sharpie marker. I like how it has a boyish, "unfancy" feel. The photos inside are adhered back to back, so it's super simple to put together, but very sturdy. (Click the photos at left to see more detail.)

Tabs made with my Mini File Tab punch are stapled here and there to label events and locations. (Check out this tip for making just-right sized tabs.) They were also made from my folder scraps. You'll also notice I made my favorite "faux notebook paper" by punching the white title card on the front of the book in my BIA and snipping away a bit of the paper with scissors.

Measurements:
Covers: 8 1/2" x 6 1/2"
(Photos are 4"x6")

Tips:
4x6 photos are super easy to punch perfectly, because they center perfectly into the machine. I made my covers to fit two pictures wide, plus a little space in between. When making a book larger than 4 inches, you'll need to make more than one set of punch holes in order to put the book together.

I opted to do one set close to the top edge and one set close to the bottom edge of the book. I also wanted the cover to hang over just a little from the pictures, so when I placed the cover into the machine, I left just a little space along the edge.

I used pliers to snip the wire into two pieces. There's no need to measure, just count the number of holes (6) and prongs to determine the proper size.

The Bind It All not only punches the holes, but closes the binding wire, forming the book. If you'd like to see it in operation, click here.

If you're already impressed and you want to get one HALF PRICE, host a show with TAC. Just a $100 party earns you a half price item, free hostess set, plus your entire order at 20% off. Not in Colorado? No problem. I'll send everything you need for a Book Show. Email me for more info.

Wednesday, August 20, 2008

CD Photo Cube Carnival

I was featured as a guest blogger on the Databazaar Blog, so I thought I would celebrate with a CD Cube showcase!


I've seen so many great variations on this project since I first posted it, so I thought I would share with you some of my favorites. The following gals did some really cute cubes:

Live, Laugh, Love with Lunar Lana
Le Scrap de Sylvie du Havre
Diane with ScRaPIt
Carol at Stampin Hot in Arizona
Bloggin with Bobbi
Bunny Cates


I also got some great tips:
Our Angel Beth Green made a pencil caddy for her hubby's desk and filled me in that a cardboard frap holder fits perfectly inside the cube. SWEET! How about making one of Stephany's Yummy Cocoa Kits and giving it with a photo cube for a fun holiday gift! My personal favorite way to decorate your holiday gifts is with The Angel Company's new Reece Soar With It Collection. {wink}


Some people are using their cubes to hold things, like tissue boxes, Bobbi's so-chic greenery centerpiece shown in the photo above and I loved RuthieB from SCS's idea of having holiday cards on display at Christmas time! Tonniece (see her link below) made her cube into a votive holder by using vellum inside her cube. Brilliant!


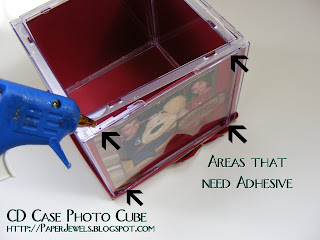
I also got a lot of questions about holding your cube all together, so I wanted to post one more instructional photo about adding adhesive to keep your cube sturdy. Whether you use a temporary tape solution or your good old glue gun, refer to this photo and to the original You Tube Video or John Wik's original Instructable for the details on making your own photo cube.


Have you crafted a cube? Use my Mr. Linky to show us your stuff! (If you're using a reader, click over to my blog to use this feature.) Be sure to leave your name and use the link for your particular post (permalink) so visitors will be sure to see your creation.
Crash course on Mr. Linky HERE


Tuesday, August 19, 2008

Freestylin'

Have you seen that show on HGTV where they rearrange the stuff you already have to redesign your rooms? Well, that's kind of like what I've been doing around here. In the last couple of weeks (while my blog has been quiet) I've been getting ready to have family in town and then was busy making the summer memories to go inside the scrapbooks. {wink}

It all started with this piece I made. John told me he'd love to see more of my work framed around the house, so I've been converting some of the art on our walls to more personal art--moments I've captured that I want to be reminded of around every corner.

This piece was for Lily's room. She has just turned three, so the Beatrix Potter prints have been replaced with some more girly, flowery decorations. She seems to be pretty happy about it.


Do you recognize the pink flower wall decoration? Yup, it's the flower coaster from Barb's challenge!

Here's something else that I thought was fun. You saw Heather mention it, but were you curious about how my Wordle came out?

I went to http://wordle.net/ and I pasted in the text from our last three holiday letters. This cloud shows you what words I use most to describe my family life. Interesting, huh? I spray painted a frame espresso brown and hung this in my powder room. Now I'm on a kick to add personality to every room. I'll keep you posted . . .